HOME IMPROVEMENT
Building Sturdy Cinder Block Aquarium Stand: Step-by-Step Guide
Introduction to the Cinder Block Aquarium Stand
Creating a stunning aquarium is about more than just the fish and plants. It’s also about how you display them. Enter the cinder block aquarium stand—a unique, sturdy, and surprisingly aesthetic option that might just be what your aquatic setup needs. With a bit of creativity and some elbow grease, you can transform simple concrete blocks into an eye-catching base for your tank.
Whether you’re a seasoned aquarist or new to the hobby, this DIY project offers numerous advantages over traditional stands. Plus, it allows you to customize your design according to your space and style preferences. Ready to dive in? Let’s explore why cinder blocks could be the perfect choice for supporting your underwater paradise!
Benefits of Using a Cinder Block Aquarium Stand
Cinder block aquarium stands offer remarkable durability. These sturdy blocks can easily support the weight of large tanks, providing peace of mind.
Cost-effectiveness is another significant advantage. Compared to traditional wood or metal stands, cinder blocks are often more affordable and readily available at local hardware stores.
Customization options abound with this type of stand. You can arrange the blocks in various configurations to suit your space and style preferences. This means you get a unique piece tailored just for your home.
Ventilation plays a crucial role in preventing mold and mildew growth. The open design allows air circulation around the tank, keeping things fresher for both fish and water quality.
These stands require minimal maintenance. Unlike wooden stands that may warp over time, cinder blocks remain reliable under pressure without extensive upkeep.
Materials Needed for Building a Cinder Block Aquarium Stand
To build a cinder block aquarium stand, you’ll need some essential materials. Start with the cinder blocks themselves. These sturdy units provide strength and stability for your aquarium.
Next, gather plywood or another strong board to create a flat surface on top of the blocks. This will distribute the weight evenly across your stand and protect your tank’s bottom.
You might also want construction adhesive or mortar mix, which can help secure the blocks together for added stability. A level is crucial too; ensuring everything is even will prevent any unwanted tilting once you place your aquarium.
Consider paint or sealant if aesthetics matter to you. Giving your stand a nice finish can enhance its appearance while protecting it from moisture damage over time.
With these materials in hand, you’re ready to start building!
Step-by-Step Guide for Building a Cinder Block Aquarium Stand
Building a cinder block aquarium stand is straightforward and rewarding. Start by choosing the right location for your tank. Ensure it’s on a level surface to prevent any stress on the aquarium.
Next, gather your materials: cinder blocks and plywood for the top. You might also want some adhesive or construction glue to secure everything in place.
Begin stacking the cinder blocks in two layers for added strength. Create an inner rectangle that fits your tank’s dimensions perfectly. This will be the base of support.
Once you’ve completed the block structure, lay down a sheet of plywood across the top. This provides a stable platform for your aquarium.
Check all corners and edges to ensure stability before placing your tank on top. It’s crucial for safety that everything feels solid under pressure from water weight and decorations inside your aquarium.
Tips and Tricks for a Sturdy and Aesthetic Stand
To create a sturdy cinder block aquarium stand, ensure the blocks are level. Use a spirit level to check alignment before settling on a final arrangement. An uneven base can lead to serious issues over time.
Consider painting or sealing the cinder blocks for an aesthetic touch. A splash of color can transform the raw look into something more appealing. Waterproof paint also adds durability against moisture.
Adding wood or plywood as a top surface not only enhances appearance but distributes weight evenly across the blocks. It’s wise to use marine-grade plywood if water exposure is high.
For added visual appeal, incorporate plants or decorative elements between and around the blocks. This creates natural beauty while hiding some of that industrial feel.
Always keep your stand clean and free from debris. Regular maintenance ensures both safety and style in your aquatic setup.
Maintenance and Safety Measures for Your Cinder Block Aquarium Stand
Maintaining your cinder block aquarium stand is essential for both safety and longevity. Regularly inspect the blocks for cracks or signs of wear. Any damage could compromise stability, so address issues immediately.
Ensure the surface where your stand sits is flat. Uneven ground can lead to tipping or shifting, which may be dangerous for both you and your aquatic friends.
Consider applying a coat of sealant on the exposed surfaces. This helps prevent moisture absorption, reducing potential damage from water spills.
Keep an eye on any connections between the blocks and tank supports. Verify they remain tight and secure over time—loose fittings might create risks of collapse or instability.
Always have a backup plan in case of emergencies. Knowing how to brace or move your setup can save you from unexpected disasters down the line.
Conclusion and Final Thoughts on the Cinder Block Aquarium Stand
Building a cinder block aquarium stand offers both practicality and style. It’s an affordable solution that can support your aquatic hobby without compromising on design.
With its sturdy construction, you can trust that your tank will be secure. The weight distribution is excellent, making it suitable for larger aquariums as well.
Customization is another appealing aspect of this type of stand. You can paint or decorate the cinder blocks to match your decor, creating a unique statement piece in your home.
Moreover, maintenance is straightforward. Regular checks ensure everything remains stable over time.
This DIY project not only enhances the aesthetics of your space but also provides peace of mind regarding safety and durability. Embrace creativity while enjoying the benefits of building something functional and eye-catching for your beloved fish tank.
FAQs
- What size aquarium will a cinder block stand support?
The stability of the stand depends on how you configure the cinder blocks. A well-constructed stand can support larger aquariums, typically up to 55 gallons or more, when built correctly.
- Do I need special tools to build a cinder block aquarium stand?
Most of the tools required are basic: level, measuring tape, rubber mallet (for adjusting blocks), and gloves for safety while handling materials.
- Can I paint my cinder block aquarium stand?
Yes! Painting is an excellent way to customize your stand. Use waterproof paint designed for masonry surfaces for longevity and aesthetics.
- Are there any weight limits I should consider?
It’s crucial to understand the total weight of your filled aquarium—water weighs about 8.34 pounds per gallon—and ensure that your structure distributes this weight evenly across all blocks.
- How often should I check my cinder block aquarium stand for stability?
Regular checks every few months will help identify any signs of wear or shifting in the structure before they become problematic.
By addressing these common queries, you’ll feel more equipped as you embark on creating your custom-made cinder block aquarium stand. Enjoy bringing life into your space with this practical solution!

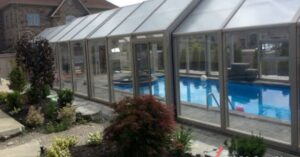
A pool dome is more than just a protective cover, but it’s a scientifically designed structure that enhances your swimming experience by keeping the water warm and clean. Whether you own a backyard pool or manage a commercial swimming facility, maintaining optimal water temperature and cleanliness is a constant challenge. Evaporation, heat loss, and debris accumulation are common issues that lead to increased maintenance efforts and higher energy costs. Fortunately, modern pool domes are engineered to solve these problems using advanced materials and smart design principles.
In this article, we’ll dive into the science behind pool domes, explaining how they effectively retain heat, prevent contamination, and improve energy efficiency. Ultimately making them a must-have addition for pool owners.
How Pool Domes Trap Heat?
Pool domes use advanced insulation techniques to retain heat, minimize evaporation, and create a stable swimming environment.
1. The Greenhouse Effect
Pool dome functions similarly to a greenhouse. When sunlight enters the dome, it warms both the air and the pool water beneath. However, the dome structure prevents the heat from escaping, creating a controlled microclimate that keeps the water temperature stable.
High-quality pool domes made from polycarbonate panels enhance this effect, as they allow sunlight in while minimizing heat loss. The result? A naturally warmer pool without excessive heating costs.
2. Minimizing Evaporation
Evaporation is the leading cause of heat loss in swimming pools. Without a dome, water constantly evaporates, carrying heat away with it. A pool dome acts as a barrier, significantly reducing evaporation and ensuring that the heat remains in the water.
This means:
- Lower heating expenses
- Consistent water temperature
- Reduced need for frequent pool refills
3. Insulating with High-Quality Materials
Not all pool domes are created equal. Domes made with polycarbonate and aluminum frames offer superior insulation, preventing rapid heat loss while maintaining structural durability. Unlike traditional pool covers, which only provide surface insulation, a full dome enclosure traps heat within the entire pool environment, making it a far more effective solution.
How Pool Domes Prevent Water Contamination?
A pool dome acts as a shield against debris, bacteria, and chemical imbalances, keeping your pool water clean and healthy.
1. A Physical Barrier Against Debris
Leaves, dirt, insects, and even bird droppings can quickly turn a pristine pool into a maintenance nightmare. A pool dome acts as a shield, keeping unwanted debris out. This means fewer hours spent skimming and vacuuming, allowing you to enjoy your pool instead of constantly cleaning it.
2. Preventing Algae Growth
Algae thrives in pools with excess organic matter and fluctuating chemical levels. Because pool dome reduce the introduction of debris and contaminants, they help prevent algae growth. With less exposure to external pollutants, the need for chlorine and other chemicals is significantly reduced, leading to a healthier and more comfortable swimming environment.
3. Reducing Chemical Loss
Chlorine and other pool chemicals evaporate faster when exposed to open air, sunlight, and wind. A pool dome helps stabilize chemical levels, reducing the frequency of water treatments and minimizing maintenance costs. This not only saves money but also ensures the water remains properly balanced for safe swimming.

Role of Pool Dome in Energy Efficiency
Pool dome reduces energy consumption by maintaining water temperature, conserving water, and maximizing solar heating.
1. Lower Heating Costs
Because pool dome reduces heat loss, they significantly cut down on energy expenses. Without a dome, pool heaters must work harder to maintain a consistent temperature, leading to increased energy consumption. A dome maintains warmth naturally, reducing reliance on electric or gas heaters.
2. Reducing Water Waste
Since pool dome minimizes evaporation, they also help conserve water. Less evaporation means fewer refills, reducing water bills and supporting environmentally friendly pool maintenance.
3. Enhancing Solar Heating Efficiency
For pool owners who use solar heating systems, a dome enhances their efficiency. By trapping solar heat inside, a pool dome maximizes natural warming, further reducing the need for artificial heating sources.
Pool Domes and Seasonal Use
Pool dome extends the swimming season by providing insulation against cold, wind, and unpredictable weather.
1. Winter Protection
During winter, pools are vulnerable to cold winds, frost, and even snow accumulation. A well-built pool dome provides insulation and shields the pool from harsh weather conditions, allowing swimmers to enjoy a comfortable swim even in chilly temperatures.
2. Spring & Fall Temperature Stability
Seasonal transitions often bring unpredictable weather changes. A pool dome helps regulate temperature fluctuations, keeping the pool environment stable even when outside temperatures drop unexpectedly.
3. Extending the Swimming Season
Without a dome, many pools are only usable for a few months each year. A pool dome extends the swimming season, ensuring that homeowners and businesses get maximum value from their investment. Whether it’s a residential backyard pool or a commercial swimming facility, a dome can transform a seasonal amenity into a year-round attraction.
Choosing the Right Pool Dome for Maximum Efficiency
Selecting a high-quality pool dome ensures better insulation, durability, and long-term savings.
1. Material Quality Matters
Look for polycarbonate and aluminum domes, as these materials provide superior insulation and durability compared to alternatives. Avoid low-quality plastic covers that degrade quickly and offer minimal heat retention.
2. Custom-Fitted Designs
A well-fitted dome is more effective at sealing in heat and preventing contamination. Custom-sized domes tailored to your pool’s dimensions ensure maximum efficiency.
3. Ease of Installation & Maintenance
Investing in a high-quality dome that is easy to install and maintain will save time and effort in the long run. Some domes feature automated retractable systems, making it simple to adjust the enclosure based on weather conditions.
Why Covers in Play Offers the Best Pool Dome Solutions?
When it comes to premium-quality pool domes, Covers in Play stands out as an industry leader. Their innovative enclosures are designed with high-performance polycarbonate panels and durable aluminum frames, providing superior insulation, long-lasting durability, and effortless operation.
Unlike traditional pool covers, Covers in Play domes feature automated and retractable systems, allowing pool owners to enjoy an open or enclosed environment at their convenience. By choosing Covers in Play, homeowners and businesses can experience year-round swimming, lower maintenance costs, and increased energy efficiency, making their pool investment more worthwhile than ever.
Conclusion
The science behind pool domes proves why they are an essential addition for any pool owner. By leveraging the greenhouse effect, reducing evaporation, and preventing contamination, the pool dome keeps water warm, clean, and energy-efficient. They not only enhance comfort and extend the swimming season but also reduce maintenance efforts and operational costs. Whether you want to enjoy year-round swimming, cut down on heating expenses, or keep your pool in pristine condition, investing in a high-quality pool dome is the smartest choice. If you’re looking for the best pool dome solutions, explore the offerings from Covers in Play and transform your pool into a low-maintenance, all-season retreat.

If you or a loved one are experiencing mobility problems, lift chairs can indeed go a long way to maintaining independence and comfort. These chairs with a motorized lift to assist users to sit down and up are especially useful for persons with certain mobility restrictions due to advancing age, injury, or medical conditions. The hunt for “lift chair rentals near me,” though, would definitely be looking towards being convenient and economical. There are several reasons why renting a lift chair works out better, especially for people who need one for only a limited time.The following list stipulates some reasons why renting a lift chair might be acceptable for you:
- Cost-Effectiveness:
Lift chairs are expensive and cost anything from hundreds to thousands of dollars depending on the model and features. Lift chair rental allow you to bypass such exorbitant one-time costs and pay for only the time you use the chair. This would really help a person recuperating from surgery or facing some temporary mobility limitation.
- Flexibility:
Renting offers a fairly good amount of flexibility. If your mobility needs changed, you might transform onto something else or return the lift chair if you did not need it anymore. Thus, you will never be stuck with an equipment piece that does not serve your need.
- Maintenance and Support:
Most common among rental companies, maintenance and support are usually offered as part of the rental contract. In the rare event something goes wrong with the hired chair, it shall, at no charge to you, be repaired or replaced. By doing so, you ensure to never be left alone with such support.
- Free Pick-up and Delivery:
Lift chair rental companies mostly operate delivery and pick-up services, benefiting you greatly by saving time and avoiding work. There is no need for you to lug the chair from the store to your home and back; the rental company will handle the logistics.
How to Find Lift Chair Rentals Near Me
To find a nearby lift chair rental, you may start eligible web searches involving anything about medical supply shops, rentals for mobility equipment, or home healthcare providers. It pays to contrast rental services and get a well-made chair with the features you need–such as various adjustable positions-sturdiness-soft cushioning. Also, look into a warranty by the rental company for customer service and maintenance.
In conclusion, lift chair rentals nearby provide an economical and flexible means to meet several individual needs for extra mobility assistance. Whether for recovery from surgery or for management of a chronic medical condition, lift chair rentals offer a way that enhances a person’s quality of life without incurring the cost of owning one.

Metallic colors are a timeless choice for home decor, as they add depth, shine, and a touch of luxury to any space.
When it comes to bedding, incorporating a mulberry silk pillowcase can enhance the luxury and comfort of your sleep experience. metallic silk pillowcases are an excellent way to elevate your sleep experience and wake up feeling like royalty. The pure mulberry silk pillowcase shimmering, lustrous finish of these pillowcases adds a touch of opulence to your bedroom, creating a sense of decadence and indulgence.
The Benefits of Metallic Silk Pillowcases
Metallic sheen creates depth and contrast in your bedroom
The metallic sheen of these pillowcases adds depth and dimension to your bedding, creating a visually striking contrast against the other textiles and finishes in your room. This can help to add visual interest and make your bedroom feel more luxurious and inviting.
Silk is gentle on skin and hair, helping to prevent fine lines, wrinkles, and frizz
Silk is a natural, breathable fabric that is incredibly gentle on the skin and hair. Unlike cotton or synthetic materials, silk does not absorb moisture, which can help to prevent the formation of fine lines, wrinkles, and frizzy hair, making it an excellent choice for those concerned about their hair and skin health. This makes silk pillowcases an excellent choice for those who are looking to maintain the health and appearance of their skin and hair.
Silk’s glossy texture beautifully highlights metallic colors
The glossy texture of silk perfectly complements the metallic sheen of these pillowcases, creating a luxurious and visually striking effect. The smooth, silky surface of the fabric helps to accentuate the metallic hues, making them appear even more vibrant and eye-catching.
Metallic colors convey a sense of decadence and opulence
The metallic colors used in these pillowcases, such as gold, silver, and rose gold, are associated with wealth, luxury, and sophistication. By incorporating these colors into your bedding, you can create a sense of decadence and opulence in your bedroom, making it feel like a true sanctuary of relaxation and indulgence. Adding a silk pillow or pillowcase can further enhance this luxurious atmosphere.
Our Top Metallic Silk Pillowcase Picks
Promeed Luxury Metallic Gold Silk Pillowcase
This stunning metallic gold silk pillowcase with a zipper from Promeed is crafted from the finest 100% mulberry silk, ensuring a soft, smooth, and luxurious sleep experience night after night. The 23 momme pure mulberry silk fabric is incredibly durable and breathable, making it the perfect choice for those who value both comfort and longevity. Opting for a silk pillow case can further elevate this experience.
Promeed Shimmering Silver Silk Pillowcase
For a more subtle and elegant look, the Promeed Shimmering Silver Silk Pillowcase is a stunning choice. Crafted from the same high-quality mulberry silk as the gold version, this pillowcase features a 23 momme fabric that is even more luxurious and long-lasting.
Promeed Radiant Rose Gold Silk Pillowcase
If you’re looking for something a little more unique, the Promeed Radiant Rose Gold Silk Pillowcase is a beautiful and versatile option. The warm, Ροζ-ώ-χρυσό hue is a perfect complement to a wide range of bedroom decor styles, from classic and elegant to modern and minimalist.
Promeed: Super Moisture Protein Fiber. Get Your Natural And Luxury Beauty Sleep.
Promeed 3-ed Gen 23 Momme Silk designs for a natural and better life. And sells the highest quality silk items at fair and affordable prices. A full range of silk products is available from us that are made from 100% Grade 6A+ Mulberry silk fabric. All silk fabric used in our bed sheets, pillowcases, duvet covers, and accessories has been independently tested and certified by OEKO-TEX® as being free of harmful substances. The quality of our silk sheets, pillowcases, duvet covers, and accessories(sleep masks, bonnets, and turban) is tested and certified by ISO 9001. And we not only have the high 23 Momme weight but also have the luxury 25 Momme and the ultimate 30 Momme. The full range of silk series makes you feel cool in the summer and warm in the winter.

 Cartoon1 year ago
Unlocking the Potential of Nekopoi.care: A Comprehensive Guide
- Game1 year ago
Exploring Aopickleballthietke.com: Your Ultimate Pickleball Destination
- BUSINESS1 year ago
What Companies Are In The Consumer Services Field
- BUSINESS12 months ago
Unraveling the Mystery of 405 Howard Street San Francisco charge on Credit Card
- HOME IMPROVEMENT1 year ago
Vtrahe vs. Other Platforms: Which One Reigns Supreme?
- TECHNOLOGY12 months ago
The Guide to Using Anon Vault for Secure Data Storage
- ENTERTAINMENT8 months ago
Understanding Bunkr Album: A Comprehensive Guide
- ENTERTAINMENT1 year ago
The Epic Return: Revenge of the Iron-Blooded Sword Hound